

18 Sep 8 Steps of Exterior Waterproofing
What is Exterior Waterproofing?
Exterior Waterproofing involves excavating and exposing the foundation wall. This means it requires the removal of landscaping and paved surfaces, that are within 3 feet of the foundation. It stops all water from coming into contact with your foundation walls, while directing the water to the weeping tile. Once the exterior wall is inspected for cracks, it then gets excavated. The walls then get sealed with a waterproofing membrane and a new drainage (weeping tile) which is placed on the side of the footing. This ensures that any water is stopped from entering the home while
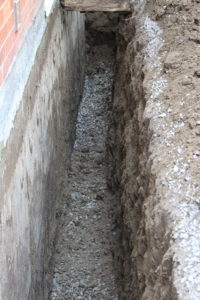
Exterior Waterproofing
also protecting your property from frost and foundation erosion preventing future leaks and damage. This method of waterproofing also allows for cracks and large gaps to be repaired.
The main advantages of exterior waterproofing are:
- Internal space is not disrupted
- Barely any preparation is required for external waterproofing, except anything you might need to move
- The new drainage system (weeping tile) drains out next to your house relieving the water pressure against foundation.
- Ensures your foundation stays dry during rain and floods.
8 Steps for Exterior Waterproofing
Exterior waterproofing isn’t just about digging it’s a bigger process that requires excavation around the area of foundation where the water is coming in. Waterproofing must be done carefully and quickly by a professional company as it may also require a permit also known as a locate.
1.Excavate foundation to expose footings
2. Repair all cracks with hydraulic cement which expands as it cures to eliminate the damage and completely fill any hairline cracks and seal mortar joints.
3. Apply second layer made of elastomeric membrane. This polymer-based sealant remains pliable and expands to bridge any future cracking. It sets like rubber and provides an unsurpassed waterproof seal.
4. Apply thermal shield barrier wrap. This helps protect the sealant from any sort of deterioration that may arise from extreme weather conditions.
5. Install an extremely durable dimpled Delta-MS membrane to obtain superior and permanent protection. The plastic-dimpled core provides compressive strength to keep headwater pressure off the face of the wall, and creates a drainage space that allows high capacity flow to the foundation drainage system. The polymeric film provides additional protection to the elastomeric waterproofing membrane.
6. Install new weeping tile with filter fabric if needed.
7. Cover weeping tile with layer of gravel.
8. Backfill and clean up job site
Rely On Our Wet Basement Waterproofing Experts
If you’ve noticed foundation cracks, spots, water, mold, and mildew, don’t ignore the signs or it could lead to more damage and possible health effects.
The basement waterproofing specialists at ACCL Waterproofing know how to repair your basement and foundation walls and keep moisture out of your basement. We would be pleased to develop a guaranteed solution to keep your basement dry
No Comments